Friday, May 30, 2008

Basic painting tips: how to prep interior

If you’re getting ready to paint a room, or the whole interior of your house but aren’t quite sure where to start then read on! This article will walk you step through step from the start of your painting project to the finish!

Before you break out the rollers and brushes and start slapping paint on the walls you need to get organized, and organization begins at the paint store! Browse the paint chip section (those little strips of paper with multiple paint colors on them are called paint chips) and take home several different selections in the color(s) that appeal to you. While you are there, pick up plastic drop clothes, painters tape, rollers appropriate for the walls you will be painting (rollers come with different length nub length for smooth or textured walls), trim brushes, and regular paint brushes for areas that can’t be painted with a roller. You will also need joint compound (for filling holes) and a flat spackle knife.

When you get back home with your paint chips, tape them to the wall and observe the different colors at different times of the day as the light varies in the room. By doing this you will ensure that the color you end up choosing is the one you really want. Once you have decided on your color choice, return to the paint store with that particular color and have enough paint mixed to cover your entire room (measure the length and width of your room and your wall height to calculate the amount of paint needed. Most paint cans have calculators that tell you how much square footage each gallon of paint will cover under normal painting conditions). If the trim in your room needs to be repainted you will also need to pick up trim paint. Trim is most commonly painted white; however it can be any color you choose! Trim paint in generally semi-gloss or gloss, both of which form a hard shell when dry that holds up to a lot of wear and tear. Walls are generally painted with a flat or satin finish. Paint with a flat finish helps hide flaws; however, it does not wash as well as paint with more shine. Paint with a satin finish is a great multi-purpose paint. It doesn’t expose flaws as much as higher gloss paint, and it cleans easily. Satin is generally the paint of choice in all room except the kitchen and bathroom where semi-gloss paints are generally used for their water resistant and high clean ability factors.

Now that you have your paint and your supplies it’s time to take a hard look at your walls. Remove all decorations, curtain rods, nails, screws and any other non-permanent miscellaneous items. Pull furniture away from the walls, and remove from the room if possible. Once the walls are bare remove any obvious dust, cobwebs or other debris. If you are painting a kitchen or other area with extremely dirty walls you will need to wash the walls with warm soapy water to strip away the grime. Allow the walls to dry thoroughly before painting! Patch any holes with join compound. Allow the joint compound to dry thoroughly and then sand smooth.

Now it is finally time to paint! Spread your drop clothes out to protect flooring and furniture. Drop clothes can be attached to trim with painters tape, or simply laid on the floor. If the trim in your room also needs a fresh coat of paint, it should be painted first and then allowed to dry thoroughly. Once your trim is dry, protect it with painters tape while painting the walls. It is generally recommended that you paint from the ceiling down in order to catch any drips. This means that you should start with the ceiling if it requires new paint, and then start at the top of the walls and paint down. Use long, even strokes and make sure paint is distributed evenly over the walls. Allow your first coat of paint to dry, and then evaluate it to see if a second coat of paint is needed. Once adequate paint coverage has been achieved carefully remove the painters tape from your trim, pick up your drop clothes, put all your decorations and furniture back and enjoy your beautiful new paint job.

Tips by: Essortment

Monday, May 26, 2008

Why Redecorate? We've Got Some Ideas

If you live alone, you probably don't need to justify redecorating your home to anyone. But if you share a home with someone, you might need to have a good reason to change a space that is working just fine.

We've thought of some of the reasons you might use as an excuse, if you have to have one, to justify changing the paint on the walls, the window treatments, or buying new furniture. Which one works for you?

# Just Because You Want To

I can’t think of a better reason to redecorate a room or a home. Having a fresh look to your home can be a real spirit lifter and can help you feel new. Not everyone can do it “just because,” but just about everyone can do little things, one at a time. Before you know it, you’ll have a new space for no reason at all besides the fact that you want to.

# You Just Moved Into a New House

Why would you want to live in a home that someone else has decorated for their life? I sure wouldn’t. Each time I’ve moved into a new home, the first thing I want to do is make it mine. And I do that by painting or wallpapering the walls and making new draperies or curtains to match the furniture or bedding that I’ve brought with me.

# You’re Getting Ready to Move Out

Many people put off decorating their home until it comes time to sell. Then they realize that they really have to do something about the dingy paint and carpet before they can sell it. While a total makeover may not be necessary, moving time is a great time to dress up a home that’s been neglected. The house will sell faster and you’ll get a better price for it if things are updated and fresh.

# Your Kids Have Moved Out

It’s sometimes called the “empty nest syndrome.” The kids have moved out. You don’t need indestructible furniture or industrial-grade flooring any more. Have you always wanted white carpet? Do you want a canopy bed but thought the kids would make fun of you? How about a Jacuzzi tub in the bedroom? Or are you ready to give up the extra bedroom to make room for a walk-in closet just for you? Here’s your chance!

# You Can’t Stand Your Childhood Room and Need to Help it Grow Up

Lots of young people move back in with Mom and Dad after graduation from college—not because they want to or because Mom and Dad want them to. It’s just an economic fact that having your own place is beyond the financial reality for many young people. But that doesn’t mean that just because you can’t have your own place you can’t make your space reflect the new adult you. Get rid of the high school sports trophies, the cheerleader pompoms, the collection of teddy bears or collection of model cars. Decorating this space for the more mature person you are. It can help you move from childhood to adulthood without ever leaving home.

Article by: Coral Nafie

Friday, May 23, 2008

Color Affects Mood

Color works magic by communicating with our emotions. Color inspires, energizes, soothes, and enlivens. See how switching from a warm color scheme to a cool one changes the mood of a living room.

Warm Color Scheme


The sun-drenched shades of red, yellow, and orange are warm, cheery, and intimate. Because warm colors seem to advance, they make small rooms appear smaller and large rooms more cozy.

This living room with coral-colored walls invites you to snuggle in with your favorite novel. Layering on neutral shades -- such as those found in the sofa fabric, the white-washed table, and the iron lamp -- helps balance and calm the intensity or brightness of the wall.

Note how the warm coral shade blends the tabletop accessories as a unit by softening their outlines, rather than defining each one separately.


Nature's fresh, spring shades of blue, green, and purple are known as cool colors. These serene hues calm and soothe and appear to recede, making a room seem larger. Of all hues, green is considered the most neutral color in terms of temperature.

Because these tones can make a room feel colder, these colors make sense for a sunny room where the brightness needs to be held in check. Against the green backdrop, the tabletop accessories stand out as individual elements because cool colors reinforce their outlines.

What Hue Are You?

Article from Better Homes and Gardens Magazine

Thursday, May 22, 2008

Toweling-Covered Armchair


Cozy to sit on and hardwearing too, toweling is also a fantastic fabric for the novice upholsterer ‑- it's stretchy, easy to handle and the pile effectively hides any less-than-perfect beginner's mistakes.

Getting Started

Time taken: 5 hours

You will need:

* Suitable armchair (choose one that is low and simply shaped ‑- old-fashioned nursing chairs are ideal)
* Enough toweling to cover the chair easily ‑- this project used 2 3/4 yards of toweling 60 inches wide
* Upholstery tacks
* 6 medium-sized buttons (to cover with fabric, or decorative)
* Strong carpet or button thread
* Sewing thread to match toweling

Tools:

* Fabric scissors
* Staple gun and staples
* Hammer
* Pins
* Medium-gauge needle

Step One

When buying a piece of furniture for a facelift, I always give it a detailed check for woodworm, damp or horrible smells indicating rotting upholstery. If I had to re-upholster this chair from scratch it would take a long time, so I gave it a beating with an old-fashioned carpet beater and then cleaned it with upholstery cleaning mousse.

Step Two

Cut a piece of toweling to approximately the same shape as the seat of the chair, adding an extra 3 inches of fabric all round for turning in when you attach it to the chair.


Step Three

Lay the fabric onto the seat and, tilting the chair from side to side as you go, fix a few staples through the fabric, attaching it to the underneath of the chair to keep the rest of the fabric in place while you fine tune. Work your way around and around the seat, reducing the gaps between staples with new ones as you go. Run another row around the chair for good measure, ensuring that any excess fabric doesn't flop down and become visible below the seat.

Step Four

Toweling is quite thick, so it is a good idea to make sure that it is held really securely with an upholstery tack every 3 inches. Hammer in the tacks firmly, but watch out for any woodwork that could be damaged easily while hammering ‑- cover delicate areas with a fabric scrap to protect them. You can now cover other areas of the chair in the same way, leaving the back of the chair as the last area to be covered.

Step Five

A button back adds interest to a chair with a tall back. You could choose to cover the buttons with the same toweling fabric, or use decorative ones such as mother-of-pearl discs. Decide where to position the buttons and mark with a pin. Using strong button thread, run it through the back of the seat, through the button loop and back again several times, ending with the needle and thread at the back of the chair. Remove the marker pins.

Step Six

Hammer in some tacks around the back of the chair frame, placing them where they won't show through the final fabric covering. Leave the tacks slightly proud of the surface and sew them to secure the button threads tightly, pulling them as taut as possible and winding around the tack several times.

Step Seven

Finish off everything neatly by stitching down the last piece of fabric, on the back of the chair back, to cover any staples and tacks that have been used to attach the other fabric sections. Because of the pile in the toweling and the loose weave underneath, your stitching does not have to be minute: As long as the thread is exactly the same shade as the toweling, you can use fairly large stitches, secured firmly, and still achieve an excellent finish.

Article from: iVillage

Monday, May 19, 2008

A Man's Guide to Home Decor

There are a few men out there who simply cannot understand a woman's need to decorate (and redecorate) their home. And shopping for furniture? That gives most men a sharp pain - usually in the area of their wallet. But as a power shopper myself, I can tell the men in the audience that home décor is a sport! Really! Just think of home decorating in terms of "guy stuff"!

You know that little flutter in the stomach when you see a fully-restored, cherry red, vintage muscle car? Complete with air-brushed flames? Chrome everywhere? Well, women can get the same flutter looking at a vintage armoire, dresser or sideboard. (Well, ok...we don't get quite as excited if it is covered with air-brushed flames and chrome!) So the next time your wife or girl friend brings home an antique table...think Shelby Cobra!

And for some men, hunting or fishing mean the thrill of the chase or the big catch. I have felt that same thrill when finding the perfect fabric or just the right painting for a room. (And I didn't have to put up with the mosquitos!) So when your wife brings home new artwork for your mantle....think big game trophy!

Remember the fun and excitement you feel when watching football or hockey? Your wife can feel the same excitement watching Trading Spaces or Extreme Home Makeover! (Some rooms score a touchdown, others are fumbles, and yet others are definite fouls!) So rather than complaining the next time your wife watches one of those home improvement shows, think Super Bowl!

Yes, home décor is a sport! Games of "New Paint Bingo" and "Antique Auction Sprint" are being played daily in your neighborhood. So instead of discouraging your wife, support her with a few cheers like: "Way to go with that red trim, honey!" "Stuff that pillow! Stuff that pillow!" (No need to don the short skirt and pompoms!) Now, if I can just get the man in my life to buy this, I can start on that new bedroom décor. Honey? What do you think of Bubble Gum Pink paint?!?

by Pamel Cole Harris

Sunday, May 18, 2008

Strategies For Lighting Your Basement

Illumination is one of the most important elements to consider when decorating or designing your basement. Light is often at a premium in this space, where windows may be lacking, or positioned high in the walls, making it difficult for sunlight to angle in. You may also have problems with a lack of electrical outlets, or fixtures.

Basements also often feel very confined and stale. Illumination is a great way to banish these feelings from the space, or at least strategically alter them to create a new ambience.

This is why it is important to consider all of your lighting options, and the various problems your basement can present for each one, when developing a plan for this space. The selection of the correct lighting can completely change the way the room is used, reinvigorating it, and giving it new vitality and function.


Strategic Light and Shadows

If your basement has a rough unfinished interior than you may want to consider using light and shadow to hide the less attractive spots, and focus attention on the areas that you want.

If your walls are a bare concrete, consider focusing your light towards the center of the space. You can then create a nook, far from the walls, by placing couches and chairs in a small circle around the source of light. In this way you will create a smaller virtual room, without walls, and hide the rough interior of the space in shadow.

A pool table with a billiard light looming over it will do essentially the same thing.

If there are features to the space that you don't like, water damaged walls, unfinished support structures etc. you should make certain to face the focus of the space away from them.

If your basement has a focal point such as a TV or a fireplace, be sure to place them opposite of any unattractive features.

The use of spot lights on various works of art, either on the wall or on pedestals and stands, will draw attention towards the pieces and away from everything else. Leaving the rest of the room almost dark, or even lighting walkways with string lights or small button lights, can create a dark and exciting art gallery.


Height Considerations

Aside from the lack of windows, many basements are also lacking in vertical height. This limits the number of fixtures you can select for placement in the ceiling.

Recessed fixtures are very popular in basements because they take up virtually no ceiling space. Track lighting and flush mount fixtures are also often used in this space.

If your basement simply does not have room for a ceiling fixture, or if you don't want to go to the trouble of an electrical installation, you can always use portable lighting solutions.

Table lamps allow you to place a light anywhere in the space. they also allow you to easily move this light anywhere you like, if you decide to change the purpose of the room.

Floor lamps have many of the same advantages as table lamps, except that they are much taller, and tend to illuminate more of the space with an ambient light, rather than directing light onto a small concentrated space.

The drawback to floor lamps is that during a flood they will become an electrical hazard because of the cords on their base. Table lamps, being in a higher position, don't face these problems.


Water and Electricity

Dampness and flooding are always going to be a potential threat to your basement. For this reason it is very important to take as many precautions as you can when lighting this space. If you have wires or chords which may cause a potential problem during a flood, consider getting a flood alert monitor to give you a heads up as soon as the water starts coming in.

Since a fire in the basement can be such a catastrophe for the entire structure of the house, you will probably want to have a trained and licensed professional do any electrical installations that you decide to incorporate into the space.

Article by: PebbleZ.com

Friday, May 16, 2008

New Decor For Sliding Glass Doors


"When closed, sliding glass doors are a wall on which you can neither paint nor hang a picture. Instead of having to live behind closed blinds, this article provides information on new options for decorating sliders to add privacy or hide an unappealing view."

Cocoa, FL (PRWEB) -- When closed, sliding glass doors are a wall on which you can neither paint nor hang a picture. They are a central element in many homes, but only contribute to a room’s décor or ambiance if there is a pleasant view through the glass. The common solution to glass doors with an unappealing view or lack of privacy is to leave the blinds or drapes closed.

An alternative to living behind closed blinds is Wallpaper For Windows!™. This special adhesive-free vinyl film is available in a variety of designs that give plain glass doors the look of etched or stained glass. Instead of closed blinds and a dark room, the room is energized with natural light and a decorative glass door.

"Many of today’s homes have sliders that are 8 ft. tall and 8 to 12 ft wide, they are a huge expanse of glass that will dominate almost any room." said Larry Cashion, President of Etch Art and creator of Wallpaper for Windows!™. "In 5 - 30 minutes any homeowner or renter can decorate sliding glass doors with designs that enhance the strengths and hide the weaknesses of the view."

Invented in 1995 as an alternative to expensive stained glass, Wallpaper For Windows!™ allows anyone to enjoy the beauty of decorative glass without the cost. From decorative Centerpiece designs that decorate without blocking the view, to full-sized glass door designs, you will find this window film a very affordable decorating option.

Installation is also simple. If needed, the product can be trimmed to size with scissors or a utility knife. The adhesive-free film is applied to the glass with a squeegee (included with every roll) and soapy water. Being adhesive-free, it is easy to position on the glass.

by EtchArt

Wednesday, May 14, 2008

Decorating With Books


Books are an integral part of many peoples homes, yet arranging them to be useful and attractive remains a fine art. Many publishers are not obliging enough to publish their novels in complimentary colors. Your favorite books may look a little shabby, especially the paperbacks. Different sizes of books can be difficult to arrange attractively. However, there are ways that you can include your books in your decor without tossing out your old faithfuls or buying only books with blue covers.

The layout of your home is going to determine how your books are going to be placed to some degree. Bookshelves can be flexible; you can use some deep ones to create a "nook" for a desk or window hideaway. If you don't have a lot of space for a bookshelf in the area where you want to store books, you still have some options. Bookshelves, fortunately, are coming in many different designs to accommodate books in places that were previously unsuited for book storage. The Sapien Bookcase, a tall, thin bookshelf capable of holding up to 70 texts, is one example of this. You can find out more by visiting the Design Within Reach website (dwr.com).

Figure out how you want to divide your books. Should it be on subject or genre? Size? Are you going to arrange them alphabetically by title or author? You have many choices. Some people have gone so far as to arrange all their books by color, irrespective of subject. Others have divided books by the room they will be of most use in; for example, cookbooks and books on food being placed in the kitchen. (The one caveat lector you must take into consideration is books in the bathroom. The humidity will warp and otherwise damage books left in the room for any length of time.)

Unless you only buy books for their appearance, you will want to be able to access them quickly for reading. No matter what your storage solution is, it must be practical. Books should be placed so that they are not compromised by objects in front of or on top of them. One method to create form and function is to use books that are vertically stacked as bookends for horizontally stacked ones. Another is to use heavier decorative items as bookends.

If you are concerned with the appearance of a few well-worn favorites, you can improve their appearance by repairing or replacing torn dust jackets, gluing spines, and taping torn covers. Another option is having the entire book rebound or rebinding yourself. There are resources on the Internet for those interested in rebinding worn books themselves. If you are really ambitious, you can rebind books with colors that look exceptionally good on your shelves.

By taking some time to arrange your books in pleasing patterns and keeping them in good repair, you can make your book collection both aesthetically pleasing and useful. This will enhance the overall experience of your home and make your books more than just repositories of information, but decorative assets in their own right.

By Jake Marsh

Tuesday, May 13, 2008

Abode à la Mode: Cheap and Easy Decor Projects


Home decor that creatively reflects your personality makes any space look instantly chic. Unfortunately, constraints on time and budget often mean our rooms stay sparse and our walls bare. You can give your home a hip new feel by adding even one unique item. We found three inexpensive and easy projects from Jeannée Ledoux's Abode à la Mode that you can complete in an afternoon. Experiment with color, fabric and size to make each one truly your own.

Slipcovered Crate Ottoman

Have you seen the outrageous price tags on ottomans? They cost nearly as much as the chairs they accompany. This homemade version has humble bones, but you can splurge on fabric to make the outcome look high-end. I recommend staples to assemble the fabric and trim for all you non-sewers out there, but machine stitches make this project more durable.

Have you seen the outrageous price tags on ottomans? They cost nearly as much as the chairs they accompany. This homemade version has humble bones, but you can splurge on fabric to make the outcome look high-end. I recommend staples to assemble the fabric and trim for all you non-sewers out there, but machine stitches make this project more durable.

What you'll need:

* At least 8 square feet of 1-inch-thick foam
* Long ruler
* Marker
* Scissors
* Hot glue gun and glue sticks
* 14 x 7 x 10 1/2-inch plastic crate
* Cake of 4-inch-thick foam at least 16 x 19 inches
* Long serrated knife
* 1 1/2 yards upholstery-weight fabric
* Pencil
* 4 yards coordinating piping
* Straight pins
* Office-type stapler and staples

Directions:

1. Draw the following dimensions on the 1-inch foam using the ruler and marker: two rectangles at 10 1/2 x 16 inches and two at 10 1/2 x 17. Cut out the foam with scissors.

2. Hot glue the 17-inch-long foam pieces to the crate sides of that length. Glue the 16-inch-long pieces to the 14-inch-long sides (they will overlap the foam on the adjacent side). If your crate has protrusions for stacking, apply the glue to these.

3. Draw a 16-x-19-inch rectangle on the 4-inch foam and cut it out with the serrated knife. Hot glue the foam to the crate bottom (which henceforth will be called the top, since it's the ottoman's seat).

4. On the wrong side of the fabric, use the pencil to mark the dimensions of the slipcover. For the ottoman's sides, two panels at 17 1/2 x 17 inches and two at 17 1/2 x 20 inches. For the top, 17 x 20 inches. Cut out the fabric panels and separate them by size.

5. Cut four 17 1/2-inch lengths of piping and set aside the remainder.

6. Join the side panels like this: Lay down a 17 1/2 x 17-inch panel, pattern side up, with the 17 1/2-inch edge near you. Lay a piece of cut piping, with its flat part facing you, 1/2 inch in from the fabric's near edge. Pin it in place. Lay down a 17 1/2 x 20-inch panel, pattern side down, with its 17 1/2-inch edge in line with the near edge of the bottom fabric and pin it in place. With the stapler in one hand, feel for the round part of the piping with your free hand and apply staples through the three layers, about 1/2 inch apart, as close as possible to the round part of the piping. Remove the pins. Continue to attach the remaining side panels by alternating the sizes and lining up the 17 1/2-inch edges.

7. Lay down the top fabric panel, pattern side up, and pin the remaining piping along all four edges, beginning and ending at the same corner. The flat part of the piping should be 1/2 inch from the edge and facing outward. Cut off any excess piping.

8. To join the top panel to the side panels, slip the sides onto the ottoman inside out. Center the top panel over the top of the ottoman, pattern side down, and pin its edges to the side panels' edges. All around the perimeter, staple through the two fabrics and the flat part of the piping as in step 6. Remove the pins.

9. Turn the slipcover right side out and put it back on the ottoman. Pull down the fabric firmly. Flip over the ottoman, turn under the loose edges and hot glue them to the inside of the crate.

by Jeanée Ledoux

Monday, May 12, 2008

20 Decorating No Nos - What Not to Do When Decorating

We can read books and magazines, watch TV shows, read online articles, and visit decorating showhouses to find all sorts of wonderful advice on things to do to get a beautifully decorated room.

But it's hard to learn ahead of time what things to avoid before you even start a decorating project.

Here is our list of the top things NOT to do, not now, not ever!

1. Don't Let Someone Make Choices for You

Your home is your personal space. Don't let someone else tell you what you should do. If you need help, ask for suggestions. But when the time comes to make decisions, they should be yours. It's your home and you should feel comfortable with the choices.


2. Don't Paint First

You can buy paint in every color under the sun. In fact, you can have paint mixed in any imaginable color you might want. Choose fabric, carpet, and upholstery first.


3. Don't Choose Paint From a Paint Chip

A small chip of a paint sample might look great in the fluorescent light in the paint store. But a whole wall of it might be overpowering. When you've decided on a color, purchase a quart of the color and paint a small section to see how the color looks in the room with natural light. If you don't want to mess up the walls, paint a piece of cardboard and tape it on the walls in the room where you plan to use the color.

4. Don't Decide on Colors in a Store

Never buy fabric, flooring, or paint on your first visit. Ask for samples of paint and carpet and swatches of fabric so you can see what they look like in your home. Check them out in natural light and in the evening with lamps.

5. Don't Settle for Blah If You Love Bold

A gallon of red paint doesn't cost any more than a gallon of white. You get my point! If you love color, find a way to use your favorite colors in your home. Choose colors that express your personality and coordinate with things you love.

6. Don't Make Your Favorite Color the Main Color

If you love red, you don't have to choose it for your walls. Instead, choose a more subtle shade to provide a background that will let items in your favorite color really "pop."

7. Don't Ignore the Psychology of Color

Don't think that you can create a relaxing sanctuary in a room with red walls. Blue and green are more calming and relaxing. Choose red and orange for play rooms or family rooms where the action is. Select a color scheme to create the atmosphere you want in the room.

8. Don't Forget Color Undertones

Not all blue is blue. Not all whites are the same white. Look beyond the main color to see if the hue is light or dark, crisp or dull. Choose coordinating colors with the same intensity.

9. Don't Force a Color Scheme

Don't "make" things match. Just because you have a red print sofa doesn't mean that it will coordinate with any red stripe draperies. Choose your color family, identify the major pieces, decide what you have that will have a place in the room, and then recover, repaint, and coordinate all the elements. Find another place for or get rid of anything that doesn't fit your plan.

10. Don't Ignore the Focal Point of Your Room

Not every room has a focal point, but if yours does, make it important. Arrange the artwork and furniture around this important element.

11. Don't Let Your Furniture Hug the Walls

Don't arrange the chairs, sofa, and tables all around the room unless you have no choice. Make groupings of furniture for conversations and pull pieces into the center of the room for a warmer feeling of comfort.

12. Don't Build Barriers

Don't put a chair in front of a door or a table in an obvious traffic area. Leave room for easy access and movement within the room.

13. Don't Settle for Cheap

Don't choose a piece of furniture because of a pretty cover or fun color. First, see if it's well made, has interesting details or classic lines. If it does, you can always recover the upholstery in a fabric you choose or refinish the frame.

14. Don't Invest in Trends

Don't break you budget on pieces that are trendy. Trends come and go. You'll want to spend your precious resources on pieces that will last for a while. If you are attracted to crystal studded or fur-covered furniture, experiment with a less expensive crystal embellished lampshade or faux fur throw.

15. Don't Keep Mismatched Furniture

If you inherit or end up with a lot of pieces that don't match, find a way to tie them together in your decorating scheme. Paint odd wooden furniture frames to match or recover pillows and upholstery with coordinating fabrics.

16. Don't Be Extravagant on Useless Pieces

If a piece doesn't serve some function and won't last for years, put your money back in your wallet. Save your funds for the necessities unless you just can't resist.

17. Don't Keep Things Because You Think You Should

Don't feel obligated to keep a piece you've inherited. If it doesn't appeal to you or it doesn't fit your space, either fix it or get rid of it. After all, it's your home. They'll understand!

18. Don't Allow Ugly Anywhere

Of course, ugly is in the eye of the beholder. But don't think you can learn to like something if you really don't. Get rid of it!

19. Don't Display Every Personal Treasure

Don't overcrowd your home with collectibles. Make each piece be important. If it isn't or if you don't have room, store them away and change your collection from time to time. You'll be glad when it's time to dust!

20. Don't Forget the Details

Don't just paint the walls and put the furniture around the room. Learn about details that make your decorating style unique. Find interesting lamps, arrange books neatly, add decorative pillows to furniture, and include fragrant candles and flowers.

Decorating is fun! If you follow our advice, you'll be able to avoid most of the major decorating mistakes and have a home you love to come home to!

Tips by: Coral Nafie

Sunday, May 11, 2008

New Renter? Decorate Your New Home on a Budget!


Perhaps you are just starting out in your first apartment rental home, or are starting over again and you don't know how to begin decorating your new place? Here are some easy, inexpensive, landlord friendly ideas for making a space your own!

Choose a feeling you want in your apartment or rental home.
Since apartments and rentals tend to be smaller spaces, choosing a set of feelings as a theme to cover the whole space can both visually enlarge the space, and make the job much less complicated. Want a relaxed, calming atmosphere to unwind in? Choose neutrals or cool colors such as blues and greens. Want to express your colorful personality? Try using bright, energetic color combinations.

If you are in need of furniture, check out yard sales, classified ads, and even thrift shops to save yourself big bucks.
Keep your choices to simple pieces that will blend with any décor, in the case of a move or a change of taste. You can make a simple platform bed with concrete cinder clocks and ¾ inch plywood or mdf board. Futon mattresses are less expensive then regular mattresses, and can offer good firm support.

By Kathy Wilson

Top 7 Fireplace Decorating Tips


1. Whether buying one for the first time or replacing an existing one, installing a new freestanding electric fireplace does not take as much work as you think. If you don’t have a fireplace mantel, consider getting one, as it will give your fireplace a more finished, polished look. You can even use a mantel in areas you don’t have a fireplace, as décor.

2. The grocery store can supply a wealth of ideas. Fruits are a low-cost way to add color and quality to a mantel. Pack empty flower vases or jugs with lemons or limes. Complete fruit exhibits with a flower arrangement. Another way to add some sparkle is by placing little votive candles around the bottom of the vessels.

Electric Fireplace.3. A mantel should have its own focal point. Often, a single large painting or mirror is used. If you decide to go this route, be sure the picture is not hung too high. You can also just lean it against the wall. Use two or more coordinated pieces of art to create a grouping for a different look. If you don’t have a fireplace, and don’t want to have one built, consider an electric fireplace as a low-cost, portable option. You can move them into any room of your home, as you please!

Oak Wood Fireplace With Screen.4. Try these seasonal changes:

• Winter – add potted evergreens, pinecones and sticks from the backyard
• Spring – use paper-whites, tulips, or forsythia
• Summer – place a flower in each of four or five identical vases, or use pots of identical orchids
• Fall – try gourds and pumpkins

5. You can spiff up your mantel with functional collectibles, whether it is flowerpots, vases, or even cookie jars. Playing cards, matches, whatever little things you may use in that room can be used to fill the flowerpots. Fill the vases with flowers, real, silk or dried. If you live in an apartment or condo, or a house without a fireplace, consider a fake fireplace. They can be inexpensive, high quality, and open up many more decorating options for you.

3 Fold Antique Copper Leaded Glass Screen6. Gourd groupings are a cheerful way to enliven a fireplace mantel. Group together white gourds and white pumpkins and set out a bunch of red grapes and grape leaves in between the gourds. Then intersperse silver and glass candlesticks in varying heights with tall white taper candles in between the gourds and grape clusters.

7. Display a grouping of floral plates on your mantel. Clean out the ashes in your fireplace and fill the firebox with a large artificial fern or a basket of colorful flowers. Place twigs in tall vases and place on each side of the fireplace mantel. Don’t forget about what is below the mantel! The right glass fireplace screen or screen can do wonders for your fireplace décor.

Article by: Michelle O'Connor

Thursday, May 8, 2008

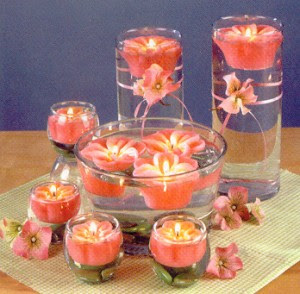
Beautiful Floating Candles

We are increasingly purchasing candles as a focal point for our home décor, and for aromatherapy-like relaxation and stress reduction.

Below are some of the beautiful decorative floating candles that can be a part of your home decor.


Picture from Floating Wax Candles Designs

Wednesday, May 7, 2008

Light Up Your Life

I enjoy lighting tealight especially at home. Choosing the right candle holders can be very handy when it comes to home decor. They reflect your personalities and also light up the ambiance of your living space.

Enjoy!


A pretty bouquet of wrapped steel stems and colored glass leaves, grows from a trio of steel tines.


A primal temple of woven coarse twigs, each cradles a Frosted Glass cylinder. The single tealight candle, in its glassy abode, casts a light rich in pure and simple Energy, invoking pagan spirits of yore. Light your temple and cast a spell, wishes will come true.


Spiral candelabra with an ascending spiral arrangement of tealight candle holders.


Tall, intricate wrought iron candelabra will have you dreaming of seaside castles in old Spain and, with its 4 glass hanging tealight candle holders, will cast a flattering blush over you and the proceedings.


This resting Bengal Tiger keeps watch at the base of this tealight candle lantern. Bask in the protective light of this calming lantern and watch as great things begin to take place.


The Circle Of Life Abalone Shell And Steel tealight Candelabra

Splash Up Your Walls with Pops of Color

I found this article by Kathy, it was brilliant. I would like to share it with the world.


Decorating a rental space can always be challenging especially for an apartment tenant or college student looking to dress up their living space temporarily. But here’s a unique way to add your own personal touch to any interior design. Let’s say you want to add a splash of color to your walls but your landlord or college dorm rules won’t let you paint the walls. So how do you put a creative spin on your own decorative style with little mess or effort? Well when I discovered a fool proof product that sparked my creative juices I knew I had to share it with you.

It’s a unique innovation that makes wall-decorating a breeze. These flexible vinyl peel-and-stick wall art can be easily removed and re-arranged at your leisure without a trace of residue or messy clean-up.

WallPops are offered in a variety of solid colors to work with, such as Lello Yellow, Electric Blue or Purple Perk. Different prints, from Island Fusion to Go Retro, add animation and design to any WallPops creation. The décor is available in 13”- round Dots, 13”- square Blox, or continuous Stripes that measure 6 ½” wide and 16’ long. Take it one step further and cut the vinyl into any size or shape to devise a truly customized design.

I love the fool-proof versatility of the product, particularly for those with an ever-evolving style. Jazz up a dull dorm room, alter your décor to suit the season, or let a child’s room morph as they age with this conformable wall décor. If you want to change your design, just peel off and start over; WallPops are washable, re-usable and leave no residue behind.

Let your imagination be your guide as you explore endless combinations and arrangements to contrive a unique look. Try layering Dots in a few different shades around one another to create a flower effect; you could also outline a door or window with the continuous Stripes variation to serve as a funky frame.

To decorate an entire wall space, create a checkerboard pattern of alternating Blox. Stick with one funky print, such as the Island Fusion floral pattern or the Lots of Dots polka-dot print, and intersperse it with splashes of complementary solid colors. Or mix, match and layer the different shapes and colors if you are looking for a retro style that is all your own.
Look no further than the new WallPops Web site, www.wall-pops.com, to begin brainstorming your very own masterpiece. The fun, interactive site offers a create-a-design feature, as well as innovative examples and helpful tips. Enjoy!

By Columnist Kathy Peterson - KathyPeterson.com

Tuesday, May 6, 2008

Top 10 One-Color Schemes for Home Decor


Looking for an easy color scheme? One-color schemes may be for you. Find our top picks for some of the most liveable color schemes for your home.

1. Black and White
Always a classic, black and white looks crisp, clean, and classy. Think black and white checkerboard floors, black furniture against white walls, or black striped drapes against a wall of red.

2. Blue and White
Soothing and serene, blue and white reminds us of lakes, sky, and sea. The look of blue and white can be interpreted in a nautical theme, spa-like sophistication, or in a formal French toile. Pastel robin's egg blue is pretty when applied to the wall, while deeper tones of navy are perfect for upholstery.

3. Red and White
A red and white scheme is often used for patterned toiles and checks. However, this is only one use of the scheme. Themed decor with strawberries or apple motifs can also be done in red and white. For a contemporary look try red and white with small touches of another dramatic color like black, aqua, or hot pink.

4. Green and White
Green is a relaxing hue in many of its iterations. Garden greens can be used in a one-color scheme in motifs of leaves and ferns. Look for soft green toile fabrics too. Neighboring greens -- yellow-green or blue-green -- can give greens a punch in a decorating scheme that uses lime or aqua.

5. Brown and White
Brown is one of the newest darlings of decorating. Dark brown walls envelop a room in a cozy coating of bittersweet chocolate hues. This scheme needs lots of white to balance the darker tones, but is easy to live with and dramatically attractive.

6. Tan and White
Not ready for dark brown? Perhaps a lighter tan is your cup of tea. Consider everything from a medium saddle tan to a pale sandy tone for the walls, outlined everywhere with white moldings. Matching furniture will create a neutral palette that can be easily updated with pops of color whenever you please.

7. Pastels and White
Pale colors look wonderful paired with white. If you love pastels consider painting every room a different tint -- pink, yellow, pale green, baby blue, and aqua -- for a home you will truly adore. Again, white will tie the spaces together with moldings and trim.

8. Orange and White
Though it may not yet be a mainstream color, orange is making a strong comeback in popularity. Coastal homes use this color that harkens to fresh citrus while middle-America prizes the color for the overwhelmingly happy note it adds to a space. Even on a dreary day it would be hard to be sad in a room dashed with orange and white.

9. Purple and White
Passionate purple is most often used for kids' rooms, yet subtler tones of purple can be effective in the bedroom and bath. Though some people do not enjoy this hue, if you're in love with it, then find ways to use it in your home.

10. White and White
Brilliant whites might be hard to live with for some, yet softer tones of ivory, beige, cream, and milky hues may just be your idea of heaven. These whites are tinged with undertones of color and can bring subtle distinction to your home.


Article by: Coral Nafie

Monday, May 5, 2008

Stop Whining and Start Decorating


I have always wanted to decorate my livings room and it remains as a thought without action. This article here really gave a kick in the butt! Are you in the same shoe as I am ?

Do you dream of evenings filled with chardonnay, candlelight and the warm glow of a picture-perfect room? Do you fantasize about hosting intimate dinner parties and being the envy of your friends and neighbors who marvel at your tasteful and comfortable décor? Do you want to create and inhabit stunning spaces like those you see in the magazines, but think it impossible because of your “ soda pop” budget?

Well stop dreaming and start planning, because I’m going to tell you how you can do all of those things and more, if you so choose. You can handily and skillfully create stylish, tasteful and comfortable spaces without breaking the bank, and no on will be the wiser. Want to know how? Okay, here’s the big secret…shop second hand and bargain stores. Combine items you find in local flea markets, flea malls, auctions and yard sales, with those of discount stores to create beautiful interiors.

What? Are you less than surprised? Heard it before? Did you think I was going to tell you something new?

While the idea of shopping “ second hand” (I know, it’s an old term. You can’t even say “ used car” anymore. The politically correct term is now “ previously owned” car. Gimme a break okay? I’m a child of the sixties.) is certainly not new, the concept of successfully shopping for items of real style and value in this manner is still very new to many people.

My mom had me on the thrift store, garage/yard sale, and auction path before I was out of the third grade. In all of the years since, she has always lived in exquisitely furnished homes that no one, unless they knew her well, would ever guess were furnished almost exclusively from places like Goodwill, Saint Vincent DePaul, the Salvation Army and the like.

While popular shows like “ Trading Spaces” , “ Queer Eye For The Straight Guy” and “ Extreme House Makeover” feed what have become our insatiable appetites for all things interior design, most of us feel that we can never achieve similar results in our own décor endeavors. Even though the shows make it look very easy, what they do on those shows still costs a lot of money if you live in the “ real” world. However, there is hope. You can achieve amazing results buying furniture and accessories on the secondary market if you’re mindful of a few things.

First, always remember that you are “ bargain” shopping. We’re using the term “ bargain” as defined by Merriam-Webster: “ an advantageous purchase” . If you purchase an item that is not in good or fixable condition, is not exactly what you want or is of no benefit toward your design vision, then it isn’t a bargain; even if it’s offered at a great price. Before embarking on this shopping endeavor, look through a collection of design and decorating magazines. You’ll want to get an idea of the atmosphere or ambiance you want to create for a space (casual, formal, traditional), what styles you prefer (modern, antique, art deco), and what mediums or material you’re drawn to (wood, ceramics and pottery, metal). Make notes. When you have finished with this exercise, you’ll have a considerably sound idea in mind of what it is you’re looking for. Now you’re ready to begin shopping. When you find something that is appealing to your sense of vision and design, it is then that you concentrate on acquiring it in the best condition possible and at the most advantageous price. Now that’s a bargain.

Second, keep in mind when shopping auctions, flea markets, flea malls (antique malls are much more expensive) and the like that there is an advantage of choice and variety in shopping this way.

Flea markets and auctions, by their very nature, offer a hodge-podge of items and merchandise. Many people fail to realize what a wonderful benefit this is. When you look through any well-published interior design or decorating magazine, what is the one thing that often comes to mind? “ I never would have thought to put those things together. But they’re so perfect.” It’s the designer’s ability to combine seemingly “ unlike” objects together that draws attention and creates unique, attractive, and interesting spaces. So, stop looking for that full set of china for your table. Combine two or even three different patterns to create one attention-grabbing display. Buy a dainty, wooden antique chair and place it in a room with a large, overstuffed art deco chair. Mix and match throw pillows of different colors, fabrics and textures for you sofa. Soften a glass-topped metal table with brightly colorful linen runners. Get the picture?

Finally, keep usability in mind when you’re shopping second hand. It may very well be the most important advantage. The whole purpose of creating beautiful and comfortable surroundings is to enjoy them. What would be the purpose of creating the most beautiful and comfortable environment if you can’t enjoy it, or if you’re hesitant to invite other people to enjoy it?

Another very good thing that my mother did for me, even as a child, is that she taught me that things are temporal. In other words, you can’t take it with you, so you’d better enjoy it while you’re here. She uses good china, cloth napkins and “ silverware” (not stainless) everyday, not just for special occasions. When you purchase items second-hand, even when they’re valuable items, you can relax a little more. If someone breaks a vase or plate, you may be disappointed, but the world won’t come to an end, and now you know of a good way to replace it. Use what you have and enjoy your surroundings constantly. That’s the true value of creating beautiful spaces.

So go, now! What are you waiting for? Express your true self through the abundance of your surroundings. Start your treasure hunt, become the envy of your neighbors, and tell your pocketbook to shut up.

See you at the markets.


Article by: Kimberly Clay

he Lost Language of Flowers and Foliage


In the mid 1800s, when someone created a bouquet, they created a message too. The message wasn't written in a letter or on a card, but in the flowers and foliage that made up the bouquet.

For the educated at that time, flowers and foliage had assigned meanings. So the combinations used to make bouquets conveyed messages, to be read only by others in-the-know.

The mythical origins of the language explains that they came from Turkey where a French painter wooed a Harem girl. He took her back to France as his wife where she taught European women to speak with flowers and foliage to their lovers. The Europeans then taught everyone else.

Some plant meanings are obvious, like the Venus' Fly-Trap signifying deceit and danger. Ouch! And a Lemon Branch meaning zest or vigor. Zing!

Some meanings are obvious if you know the Latin name for the flower, like the Daffodil. In Latin it's called a Narcissus, named for the vain god. The Daffodil signifies egotism.

The more interesting are the counter-intuitive ones, like a Cactus symbolizing warmth. But if you think about it, the Cactus grows in a warm climate. The prickliness is ignored.

It's interesting to note that some meanings are different than meanings we commonly accept today, such as for the Shamrock. It does not symbolize luck, but instead means lightheartedness.

And the holiday-season favorite, Mistletoe, does not mean a kiss, but instead means "I surmount difficulties". Perhaps the difficulty surmounted is how to get a certain person to let you kiss them, or how to get a certain person to kiss you? Just a thought...

One plant meaning is still commonly known. The Olive Branch is the universal symbol of peace. And you do still hear people say someone is as solid as an Oak. The Oak symbolizes bravery.

While the language of flowers and foliage is a dead language today, the dictionaries for this language still exist and inspire the more romantic, or devious, among us. If that includes you, here are some suggestions.

* A bride's bouquet of Blue Violets and Forget-Me-Nots surrounded by Ivy promises a faithful and true love within marriage.
* A Cabbage Rose and Lupines sent ahead by a date means the person will arrive as an ambassador of love, voracious for your company.
* You could head off the ambassador with a bouquet of Orange Blossoms and Acacia Leaves declaring your chastity (with them) and offering friendship instead.
* If you receive Variegated Tulips with Peonies it could be you have an admirer of your beautiful eyes who's too bashful to tell you in person.
* Watch out for an Oleander Branch with Lavender around a Tuberose. Someone could be trying to tell you to beware and to distrust dangerous pleasures.
* But Hollyhock with Sweet-Peas means someone has ambitions for delicate pleasures.
* A sweet arrangement is Buttercups with Daisies and Magnolia, communicating a childish, innocent, love of nature.
* Even sweeter is Honeysuckle, meaning generous and devoted affection.
* At a time of loss, Pansies with either Red Poppies, Marigolds or Pine Branches tell a person of your thoughts for them of consolation, despair and pity.
* But if the person mourning responds with Mimosa and Elm branches, they're telling you they're still sensitive yet coping with dignity.
* Decorating your doorway with Oak Branches would signify your hospitality to your party guests as they arrive.
* And a gift bouquet for your party host of Sweet Basil, Parsley, Mint, and Sage will not only make the food more flavorful, but also send good wishes for the festivity, and praises the host for their virtue, especially their domestic virtues.
* The earthy combination of Grass and Wheat stocks means there's to be a submission with an expectation of great riches.
* But for the broken heart, try sending the heart-breaker some Lettuce Leaves with Hydrangeas and one White Rose Bud. If they understand the language of flowers and foliage, they'll know you consider them a cold-hearted, boaster who's heart is ignorant of love.

I'll leave you with an Oak leaf with an Olive Branch, or the wish that you're brave enough to seek peace where you now have strife.

Article By: Candida Martinelli

Blogger template 'YellowFlower' by Ourblogtemplates.com 2008